Android applications, like most mobile phone applications, are developed in a host-target
development environment. In other words, you develop your application on a host computer
(where resources are abundant), and download it to a target mobile phone for testing
and ultimate use.
To write your own Android mobile phone applications, you’ll first need to collect
the required tools and set up an appropriate development environment on your PC
or Mac.
The Android SDK supports several different development environments. In this article
we will focus on using Eclipse, because it is the best integrated with the SDK,
and it’s freely available. The following set of tools would be required esstential
irrespective of which operating system is being used:
- The Eclipse Integrated Development Environment
- Sun’s Java Development Kit (JDK)
- The Android Software Developer’s Kit (SDK)
- A special Eclipse plug in: the Android Developer Tool (ADT)
Creating an Android Development Environment
The Android Software Development Kit supports Windows (XP and Vista), Linux (Ubuntu
Dapper Drake), and Mac OS X (10.4.8 or later) as host development environments.
Installation of the SDK is substantially the same for any of the operating systems,
and most of this description applies equally to all of them. Where the procedure
differs, we will clearly tell you what to do for each environment.
- Install Eclipse
- Check for Required Plugins
- Install JDK: The Android SDK requires JDK version 5 or version 6.
- Install Android SDK: This is where you’d start if you already have the right versions
of Eclipse and the JDK loaded. The Android SDK is distributed through Google’s code
site, http://code.google.com/android/download.html
- Update Environment Variables: To make it easier to launch the Android tools, add
the tools directory to your path.
- Install the Android Plugin (ADT): https://dl-ssl.google.com/android/eclipse
Click here for more details
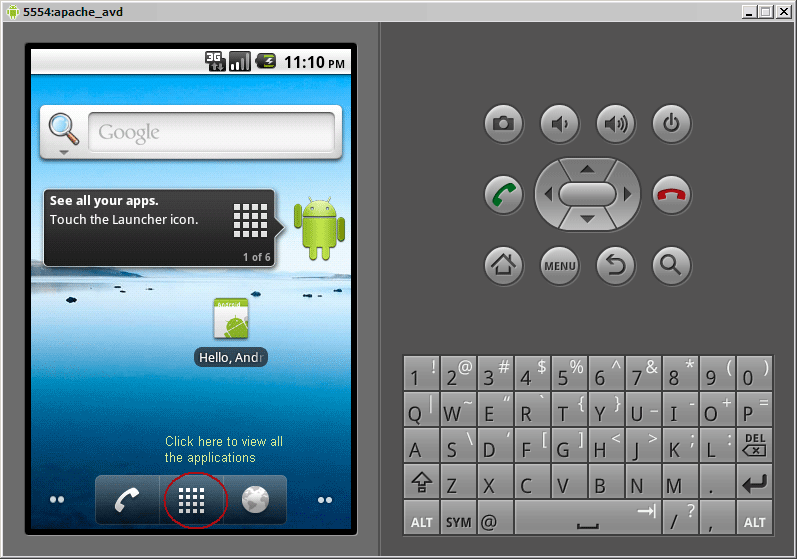
Create an AVD
In this tutorial, you will run your application in the Android Emulator. Before
you can launch the emulator, you must create an Android Virtual Device (AVD). An
AVD defines the system image and To create an AVD:
- In Eclipse, choose Window > Android SDK and AVD Manager.
- Select Virtual Devices in the left panel.
- Click New.
The Create New AVD dialog appears.
- Type the name of the AVD, such as "apache".
- Choose a target. The target is the platform (that is, the version of the Android
SDK, such as 2.1) you want to run on the emulator.
You can ignore the rest of the fields for now.
- Click Create AVD.
Starting a New Android Application: HelloAndroid
Several components are needed to build an Android application. Fortunately, the
Eclipse IDE with the Android plug-in automates a lot of the work needed to create
and maintain these components. We will start by using the IDE to create a project
for our application.
- Start up Eclipse and select “File -> New -> Project…” from the menu bar (be sure
to select “Project…,” not “Java Project”).
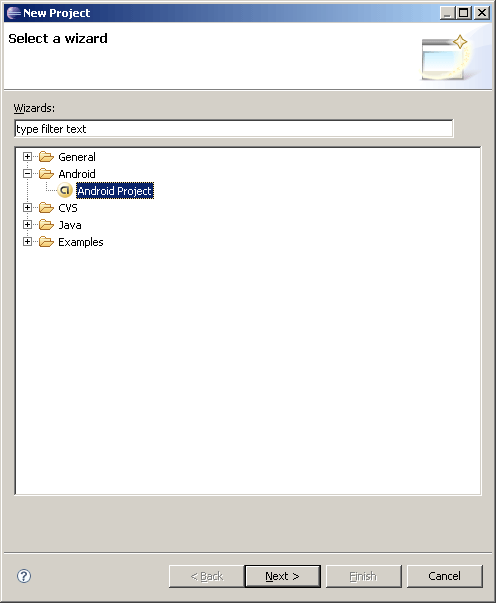
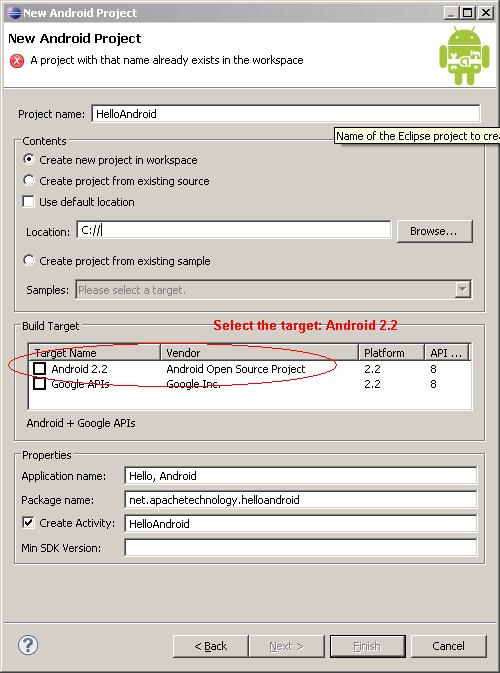
- Select “Android Project” and click “Next” to get the “New Android Project” dialog
box.
- We’ll use “HelloAndroid” as the name for both the Project and the Application. You
don’t need to change the button or checkbox selections, and we’ll use the package
name net.apachetechnology.helloworld as shown.
- Every Android application has to have at least one Activity (an executable that
usually has a user interface), so let’s say we’re going to include an Activity called
HelloAndroid, as shown in the dialog box.
- Click “Finish,” and the Android Development Kit does a number of things for you,
to make your life easier as a developer.
- The ADK created a HelloAndroid directory in the default Eclipse workspace for your
project.
- The following figure displays the files and directories that the ADK has created.

It also created subdirectories for your source files (.src), references to the Android
Library, assets, resources (.res), and a manifest file (AndoidManifest.xml). In
each of the subdirectories it created another level of subdirectories as appropriate.
Let’s take a quick look at them:
Sources (under .src)
- Contains a directory structure that corresponds to the package name you gave for
your application: in this case, com.android.helloworld.
- Contains a Java template for the Activity you indicated was in the application (HelloAndroid)
and a directory of resource references (R.java). We’ll come back to R.java later.
Android Library
- This is just what it says. If you like, you can expand the android.jar tree and
see the names of the modules included in the library. This is where your application
will go for Android library references.
assets
- Files you want to bundle with your application. We won’t have any for HelloAndroid.
Resources (under .res)
- Drawable resources are any images, bitmaps, etc. that you need for your application.
For HelloAndroid, the ADK has supplied us with the default Android icon, and that’s
all we’ll need.
- Layout resources tell Android how to arrange items on the screen when the application
runs. These resources are XML files that give you quite a bit of freedom in laying
out the screen for different purposes. For HelloAndroid, we’ll just use the defaults
generated by the ADK
- Values are constants, strings, etc. available for use by your application. Keeping
them outside the sources makes it easier to customize the application, such as adapting
it for different languages.
Manifest (AndroidManifest.xml)
- This is another XML file that tells the Android build system what it needs to know
to build and package your application so it can be installed on an Android phone
or the emulator. This file has its own specialized editor, which we’ll describe
as we get to more complicated applications.
Double Click on HelloAndroid.java
Looking quickly at the template code that the ADK has provided for us, we can note
several things:
- The ADK has included the package reference we asked for, which is consistent with
the directory structure it created.
- It has also created a (collapsed) set of imports for the library references it knows
we need.
- It created a class definition for the Activity we said we wanted (HelloAndroid)
including a method called OnCreate.
- For the moment, don’t worry about the parameter passed into OnCreate. The icicle
Bundle is a way of passing data between activities and storing data between instantiations
of the same Activity. We won’t need to use this for HelloAndroid.
- One special line of code has been included in OnCreate.
package com.example.helloandroid;
import android.app.Activity;
import android.os.Bundle;
import android.widget.TextView;
public class HelloAndroid extends Activity {
/** Called when the activity is first created. */
@Override
public void onCreate(Bundle savedInstanceState) {
super.onCreate(savedInstanceState);
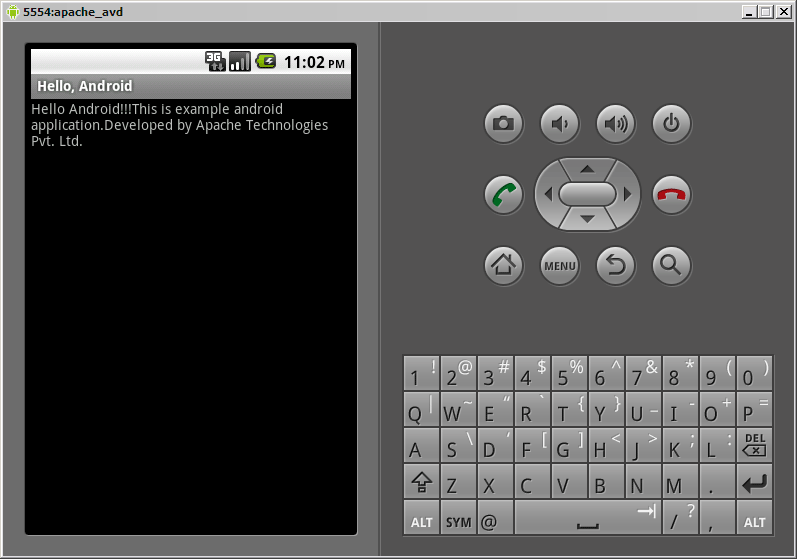
TextView tv = new TextView(this);
tv.setText("Hello Android!!!");
tv.append("This is example android application.");
tv.append("Developed by Apache Technologies");
setContentView(tv);
}
}
setContentView (R.layout.main)
Remember that Android uses layouts to define screen layouts on the target, and that
main.xml was the name of the default layout file that the ADK created for us under
.res/layout. The R.java file is generated automatically and contains java references
for each of the resources under .res. You will never need to edit the R.java file
by hand— the ADK takes care of it as you add, change or delete resources.
Double Click on main.xml
Again, let’s look at the key features of this template code:
- Like any other XML file, this one starts with a reference to the XML version and
encoding used.
- LinearLayout is one of the screen layout formats provided by the ADK. There are
several others, which can be combined hierarchically to create very complex screen
layouts. For our purposes, a simple linear layout is fine.
Within the LinearLayout definition:
The code:
xmlns:android=”http://schemas.android.com/apk/res/android”
identifies the XML schema being used.
The code:
android:orientation=”vertical”
android:layout_width=”fill_parent”
android:layout_height=”fill_parent”
defines an orientation, width and height for the entire scope of the layout.
TextView describes how to handle text within…. It resembles the text boxes you may
have encountered when programming in other graphical environments.
Within the TextView definition:
The code:
android:layout_width=”fill_parent”
android:layout_height=”wrap_content”
a width and height for the TextView box.
The code:
android:text=”HelloAndroid, HelloAndroid”
provides some text to display in the TextView. By a stroke of luck, the ADK has
already included text that is almost what we wanted to display anyway. Just to show
them who’s boss, change the android:text line to say “Hello, Android!”, or something
else equally clever:
android:text=”Hello, Android!”
if you edit the file, save it either from the Eclipse File menu (File -> Save) or
by clicking on the diskette icon in the menu bar.
Believe it or not, we’re done. We don’t have to write a single line of Java to create
this application.
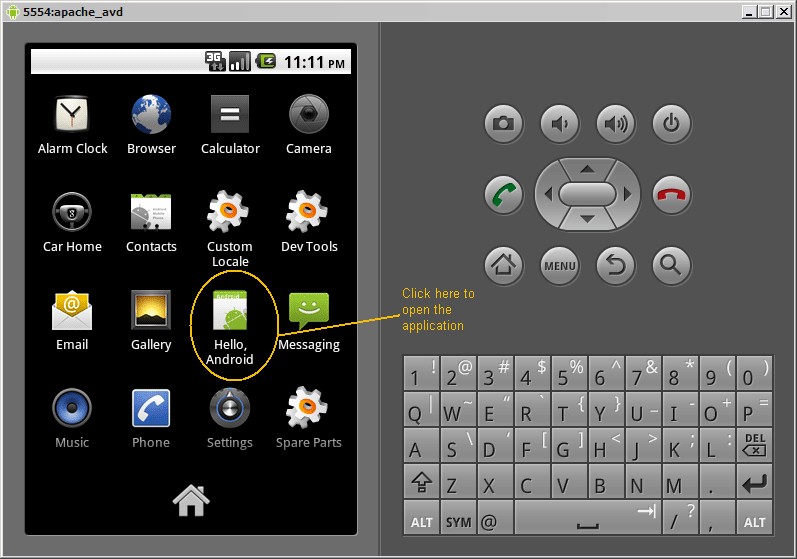
Running the application
From the Eclipse menu bar, select Run -> Run. A “Run As” dialog box will pop up.
Select “Android Application” from the list and you can see your first Android Application.
Invoke the application